Get Secure Remote Support for Your Windows Computer
We provide remote support for Windows using a secure tool called Screen Connect, designed to help our clients quickly resolve issues on their Windows PCs.
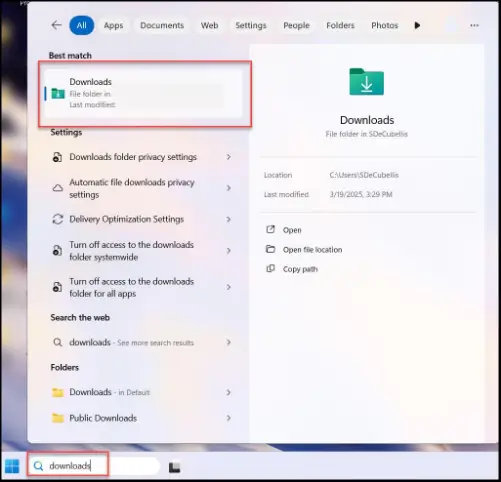
If you are on Windows and have the search bar at the bottom of your screen (Windows 10 or 11), type “downloads” in the search bar and then click into your Downloads folder. See the example below.
Get our free booklet on the Top 5 ways to increase network security
Downloading the file
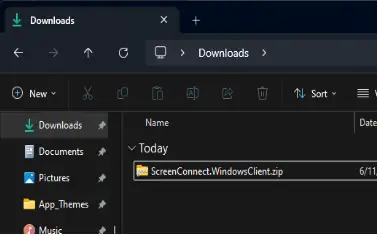
When joining, ScreenConnect downloads a file named ScreenConnect.WindowsClient.zip. By default this is downloaded to your browser’s “downloads” location, which is usually C:\Users\[your name]\Downloads.
How to find the Downloads folder
1. If you are on Windows and have the search bar at the bottom of your screen (Windows 10 or 11), type “downloads” in the search bar and then click into your Downloads folder.
2. If you do not have a search bar at the bottom of your screen, simply navigate to your Windows Start menu and search “downloads” there to find your Downloads folder
Extracting and running the ScreenConnect file
Windows
Once the file finishes downloading, you must extract the contents of the Zip file and run the main file.
It doesn’t matter if you are on Main Street, Highland Ave, Meyers, North Avenue, Roosevelt Road, or 22nd Street, we can provide onsite and remote support to fit your needs.
Step 1
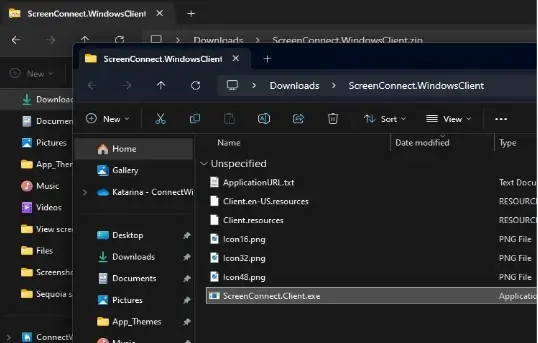
In your Downloads folder, double-click on ScreenConnect.WindowsClient.zip
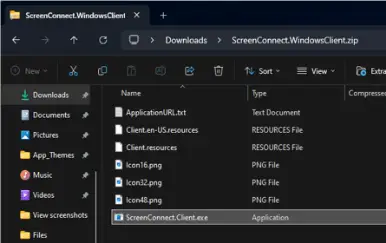
This reveals the contents of the Zip file:
Step 2
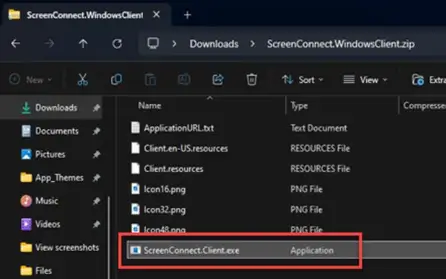
Extract all the files in ScreenConnect.WindowsClient.zip by double-clicking on the ScreenConnect.Client.exe file. (outlined below)
You will then see a pop up prompt from Windows, and click Extract all.
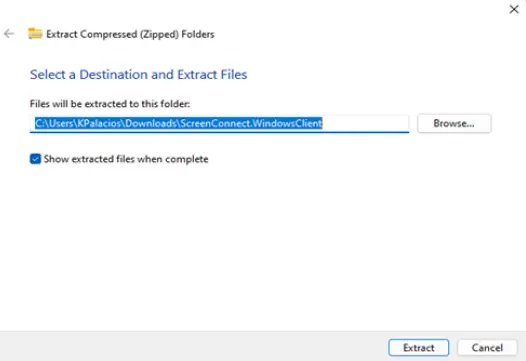
3. Select a location to extract the files
In most cases, you will already see a location displayed (see below) and if so, you can click through this prompt by just clicking Extract.
4. Run ScreenConnect. Client.exe
Windows opens a new explorer window in the location where the files were extracted. Double-click on ScreenConnect.Client.exe to connect to your session.
During a session
How can I tell a technician has connected to my machine?
• Your mouse cursor will flicker • The technician can move your mouse cursor and type on the screen • Your background image may change to a solid black background • You may see the ScreenConnect logo ( ) in your system tray
Keyboard and mouse control
During a session, you can still move your mouse and type. You and your technician, however, will be competing for control.
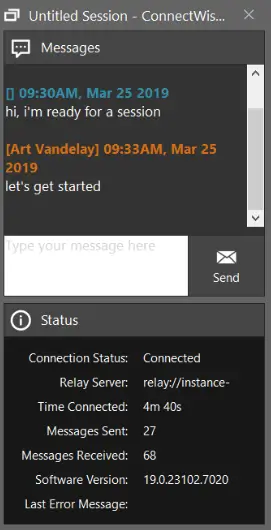
Chat
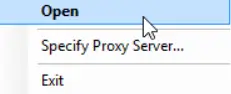
A great way to communicate with your technician is by using the chat feature. Right-click on the ScreenConnect logo ( ) in your system tray and select Open. A new window opens where you can send and receive messages from your technician.
Finishing a session
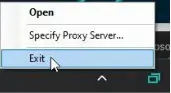
Once a technician has completed their session, they will usually end the session for you. In case you need to terminate a session, right-click the ScreenConnect logo ( ) in your system tray and select Exit.
We provide remote support for Windows using a secure tool called Screen Connect, designed to help our clients quickly resolve issues on their Windows PCs.